
pfSenseの初期設定をしていきます
初回起動時
この段階ではまだLANケーブルを繋がずスタンドアローンの状態で設定してます
Netgate RCC-VE 4860を通電させると自動でpfSenseが起動することを
コンソールポートで確認します
pfSenseの初回起動時には初期設定が必要となります
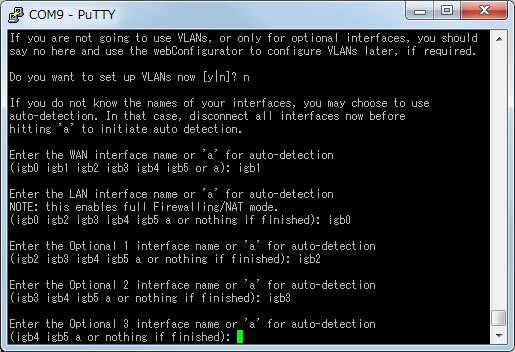
最初はVLANの設定をするかどうかです
この段階ではnでスキップします(VLAN使う場合でも後で設定できます)
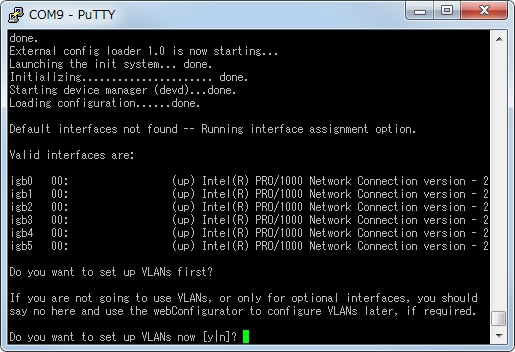
Default interfaces not found -- Running interface assignment option.

Valid interfaces are:

igb0   00:00:00:00:00:00   (up) Intel(R) PRO/1000 Network Connection version - 2
igb1   00:00:00:00:00:00   (up) Intel(R) PRO/1000 Network Connection version - 2
igb2   00:00:00:00:00:00   (up) Intel(R) PRO/1000 Network Connection version - 2
igb3   00:00:00:00:00:00   (up) Intel(R) PRO/1000 Network Connection version - 2
igb4   00:00:00:00:00:00   (up) Intel(R) PRO/1000 Network Connection version - 2
igb5   00:00:00:00:00:00   (up) Intel(R) PRO/1000 Network Connection version - 2

Do you want to set up VLANs first?

If you are not going to use VLANs, or only for optional interfaces, you should
say no here and use the webConfigurator to configure VLANs later, if required.

Do you want to set up VLANs now [y|n]?
次はWANとして使うLANポートを指定します
LANポートとインターフェース名
ETH0 : igb1
ETH1 : igb0
ETH2 : igb2
ETH3 : igb3
ETH4 : igb4
ETH5 : igb5
ここで重要なのはETH0とETH1です
ETHとigbの数字が逆になります
これはNetgateのRCC-VEだけに限らずpfSense公式ストアのSG-4860でも同じ仕様
今回はETH0をWAN、ETH1-ETH5をLANで使う予定なので
WANはigb1を指定
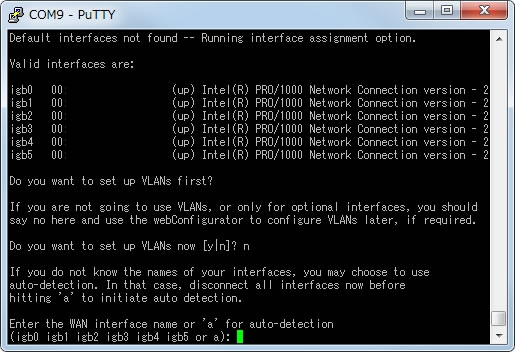
If you do not know the names of your interfaces, you may choose to use
auto-detection. In that case, disconnect all interfaces now before
hitting 'a' to initiate auto detection.

Enter the WAN interface name or 'a' for auto-detection
(igb0 igb1 igb2 igb3 igb4 igb5 or a):
次にLANポートを聞かれるのでigb0を指定
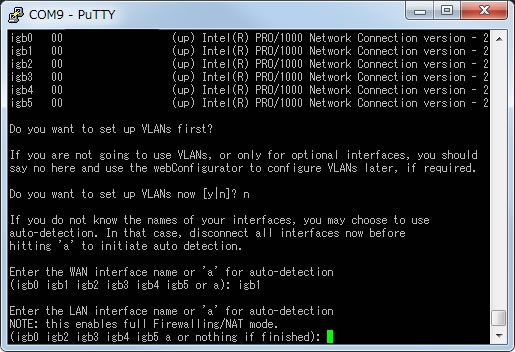
Enter the LAN interface name or 'a' for auto-detection
NOTE: this enables full Firewalling/NAT mode.
(igb0 igb2 igb3 igb4 igb5 a or nothing if finished):
次にOPT1ポートを聞かれるのでigb2を指定
OPTポートとはWAN、LAN以外のポートでどう使うかはWEBGUIで設定可能

Enter the Optional 1 interface name or 'a' for auto-detection
(igb2 igb3 igb4 igb5 a or nothing if finished):
次にOPT2ポートを聞かれるのでigb3を指定
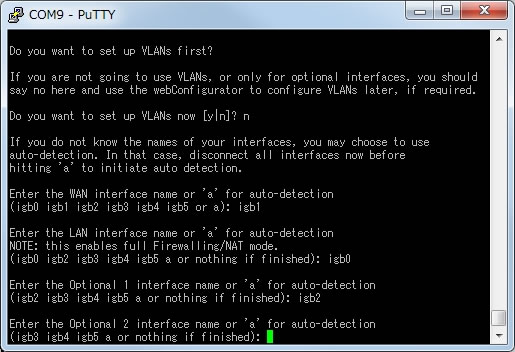
Enter the Optional 2 interface name or 'a' for auto-detection
(igb3 igb4 igb5 a or nothing if finished):
次にOPT3ポートを聞かれるのでigb4を指定
Enter the Optional 3 interface name or 'a' for auto-detection
(igb4 igb5 a or nothing if finished):
次にOPT4ポートを聞かれるのでigb5を指定

Enter the Optional 4 interface name or 'a' for auto-detection
(igb5 a or nothing if finished):
次にOPT5ポートを聞かれるがもう割り当てないので空のままENTERキーを押す

Enter the Optional 5 interface name or 'a' for auto-detection
( a or nothing if finished):
割り当ての確認画面が出るので問題がなければyで設定を保存する

The interfaces will be assigned as follows:

WAN  -> igb1
LAN  -> igb0
OPT1 -> igb2
OPT2 -> igb3
OPT3 -> igb4
OPT4 -> igb5

Do you want to proceed [y|n]?
設定を保存すると起動処理が再開されます
そして無事に起動した場合は各操作メニューが表示される
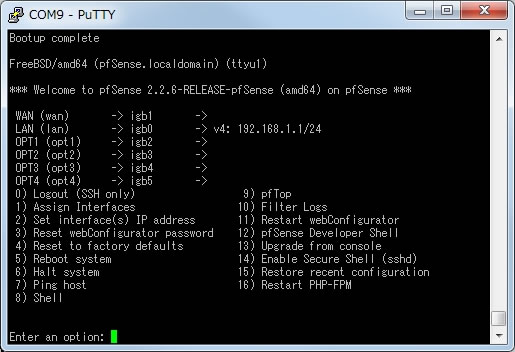
Bootup complete


FreeBSD/amd64 (pfSense.localdomain) (ttyu1)


*** Welcome to pfSense 2.2.6-RELEASE-pfSense (amd64) on pfSense ***

 WAN (wan)       -> igb1       ->
 LAN (lan)       -> igb0       -> v4: 192.168.1.1/24
 OPT1 (opt1)     -> igb2       ->
 OPT2 (opt2)     -> igb3       ->
 OPT3 (opt3)     -> igb4       ->
 OPT4 (opt4)     -> igb5       ->
 0) Logout (SSH only)                  9) pfTop
 1) Assign Interfaces                 10) Filter Logs
 2) Set interface(s) IP address       11) Restart webConfigurator
 3) Reset webConfigurator password    12) pfSense Developer Shell
 4) Reset to factory defaults         13) Upgrade from console
 5) Reboot system                     14) Enable Secure Shell (sshd)
 6) Halt system                       15) Restore recent configuration
 7) Ping host                         16) Restart PHP-FPM
 8) Shell


Enter an option:
先ほど設定したigbなどが表示されているはずです
もし設定をやり直したいなら1を入力して
1) Assign Interfacesを選択してください
WEBGUIへの接続
LAN (lan) -> igb0 -> v4: 192.168.1.1/24
というのが表示されていることを確認して
LANに指定したigb0ポートへLANケーブルを接続してPCと接続します
今回、LANに指定したigb0はETH1です
初期設定だとDHCPが有効になってると思うので
接続するPC上のネットワーク設定では
IPとDNSサーバの設定は自動的に取得するにしていて問題ありません
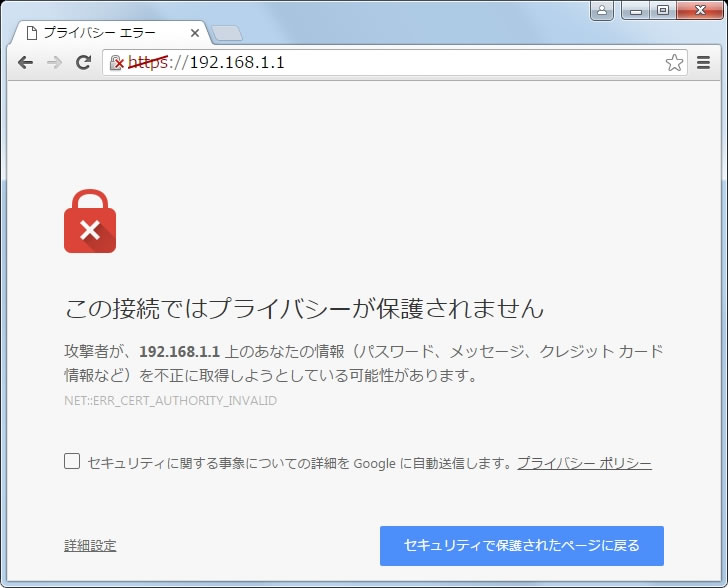
早速ブラウザでWEBGUIを開きます
https://192.168.1.1/
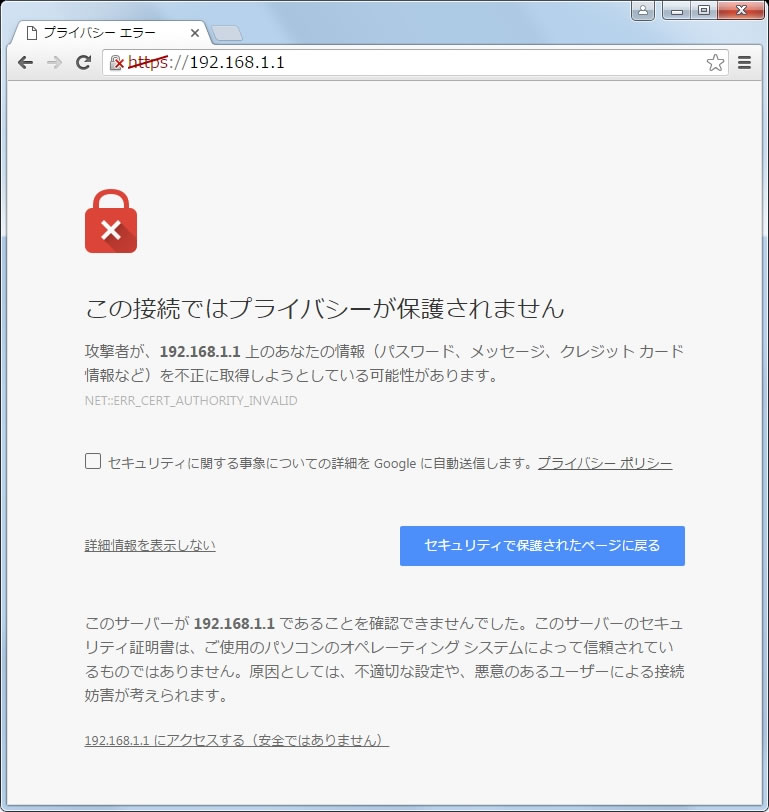
HTTPSを使っているので警告が出るブラウザもあります
その場合は各ブラウザで設定するなり回避するなりしてください
Chromeの場合
回避するには左下の詳細設定をクリックして
「192.168.1.1 にアクセスする(安全ではありません)」を選択
無事にログイン画面が表示される
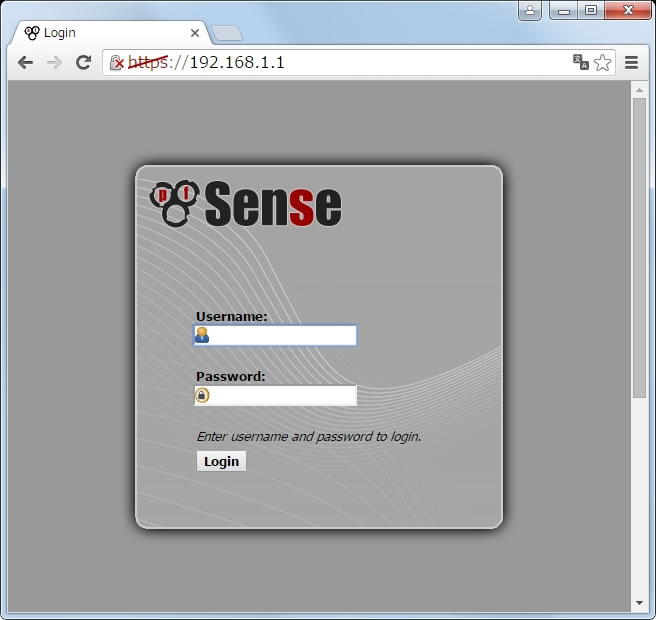
ユーザ名・パスワードの初期値を使ってログインします
ユーザ名 : admin
パスワード : pfsense
ここまでくればコンソールポートはほぼ不要で
ここからは自作PCでのpfSenseと同じ設定方法になります
続きの設定は別エントリーで

コメント